ParaChord is For Chords
ParaChord makes it easy to create, import, and edit guitar lead sheets, and keep them all organized for easy viewing on your phone or tablet.
ParaChord is a lightweight, minimalist app that seeks to do just enough to be useful while keeping the interface uncluttered.
ParaChord is built around the ChordPro file format. ChordPro is a specification for text-based interchange of lead sheets. In the spirit of doing just enough to be useful, ParaChord implements a useful subset of the ChordPro spec.
In this document, and in the app, we’ll refer to ParaChord lead sheets as “songs”.
A Quick Tour
The home screen for ParaChord is a list of songs, shown alphabetically by song title or by artist.
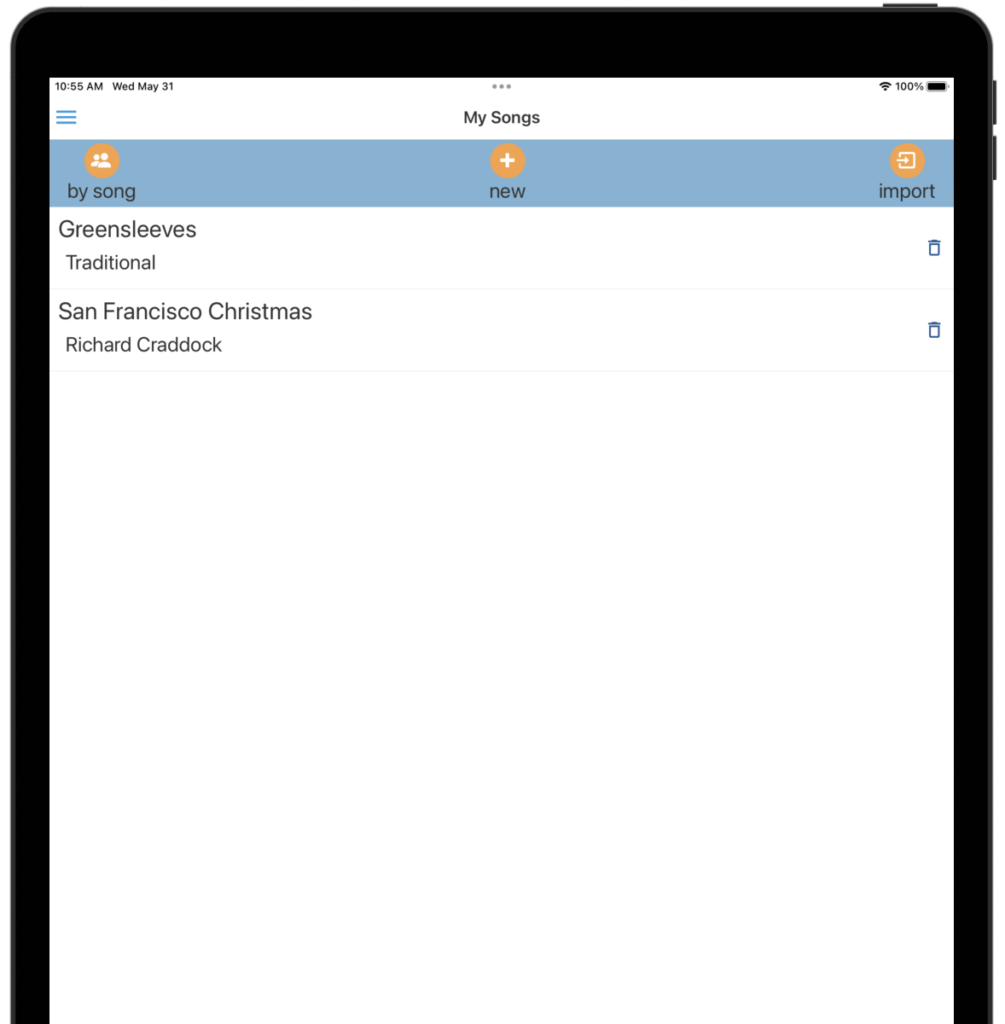
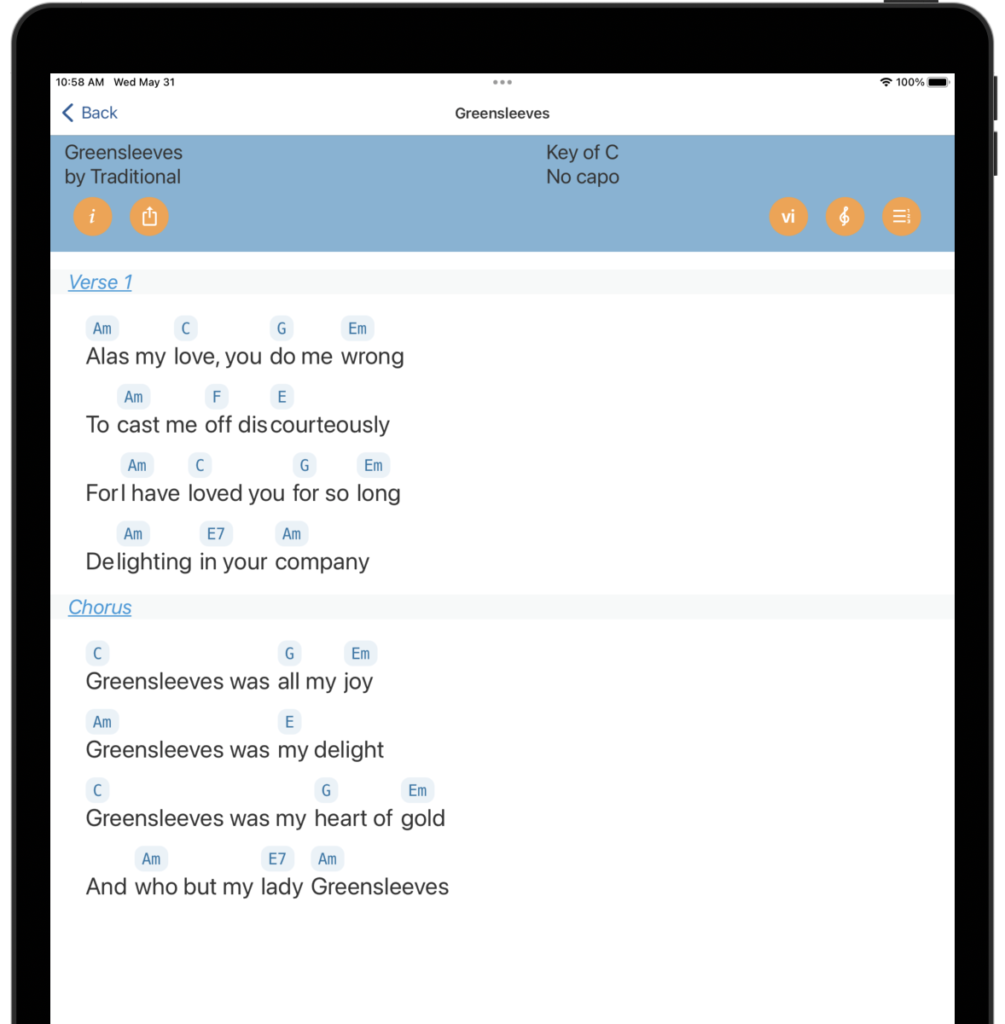
Across the top of the screen, you have action buttons that let you toggle the list order, create a lead sheet for a new song, or import a song’s lead sheet.
The menu in the upper left corner gives you access to the Chord Diagram and About screens (more on these later).
ParaChord comes with a built-in song called “Greensleeves”. Go ahead and select it to bring up the Song screen, as shown in the second image.
The Song screen shows basic information about the song and displays the song’s chords and lyrics arranged in sections (like “Verse 1” and “Chorus”).
You can press on any chord symbol to bring up a chord diagram:
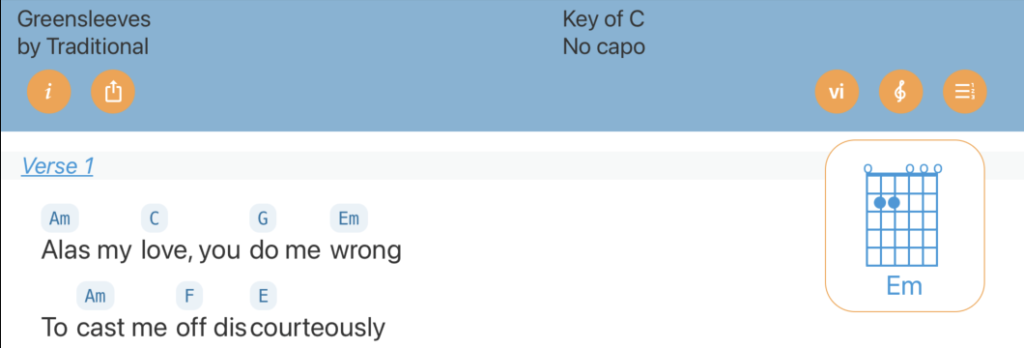
The orange buttons in the header, from left to right, let you: edit the song information, export the song in ChordPro format, display chord numbers instead of names, transpose the song to a new key, and change the capo setting.
Editing
Press on the Section header for Verse 1:
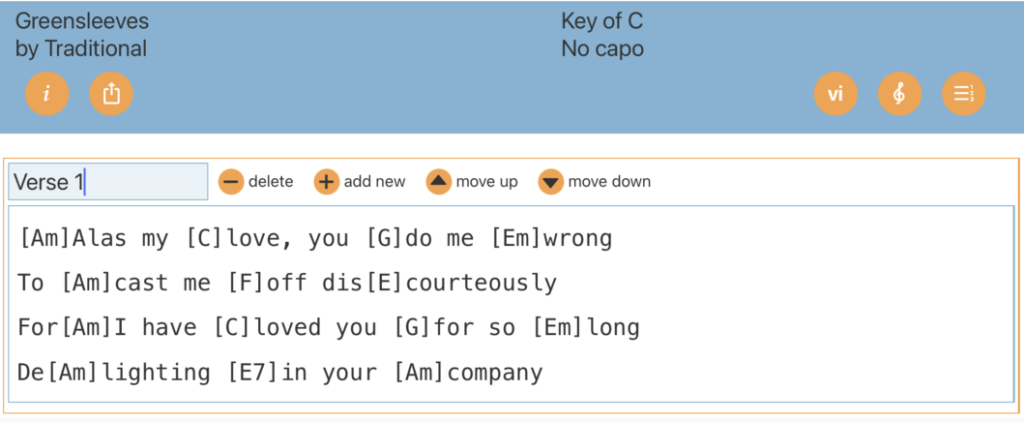
The display changes to allow you to edit the section name and the contents of the section. You can also delete the section, add a new section, and move the section up or down.
You’ll see that the section contents are now shown in ChordPro format, in which chord names, enclosed in square brackets, are interspersed with lyrics. You can edit the section to your heart’s content, then press anywhere outside the section to save changes and close the section editor.
Now that you’ve had a quick tour, let’s go into more detail about each screen.
The Song List Screen
The Home screen in ParaChord is your Song List. Here, you see all the songs you’ve created or imported and you can select any Song to view it. You can sort songs by title or grouped by artist.
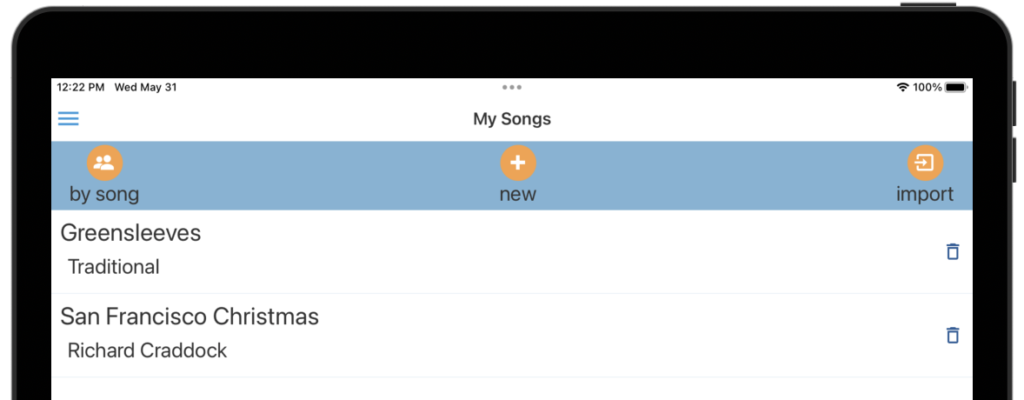
From here, you can create a new song, import a song, and delete individual songs.
Importing a song
Important: It is up to you to comply with all copyrights and terms and conditions of the sources that you import into ParaChord.

On the Import Screen, you’ll find instructions and a button to Import Now. When you import, ParaChord reads the clipboard looking for text that it can interpret as a lead sheet.
ParaChord understands how to interpret:
- a song in ChordPro format
- a song in plain text format
- a URL to a website that displays a lead sheet in a format that ParaChord understands
ParaChord attempts to interpret the text (or, in the case of a URL, the text received from that URL) as a lead sheet, and will be somewhat liberal in it’s interpretation.
If ParaChord is able to successfully interpret the text as a lead sheet, it will allow you to add the Song to your collection.
When importing plain text ParaChord looks for Chord names appearing above lyrics and makes a best-guess to translate that into its internal ChordPro format.
Here’s an example of importing plain text:
San Francisco Christmas

        Fmaj7           Eb13            Dm7 Dbdim7
Now the wreaths are all hung in from of Macy's
…and the result of the import:

Creating a New Song

To create a new song, just press on the new song button. You’ll be taken right to the Song screen with a blank song titled “New Song”. See The Song Screen section below for editing options.
Deleting a Song

To delete a song, press the trash can icon to the right of the song name that you wish to delete. Be careful! There is no undo!
The Song Screen
The Song Screen lets you view and edit a lead sheet. Basic song information is shown along the top, including the song title, artist, key, and capo position.
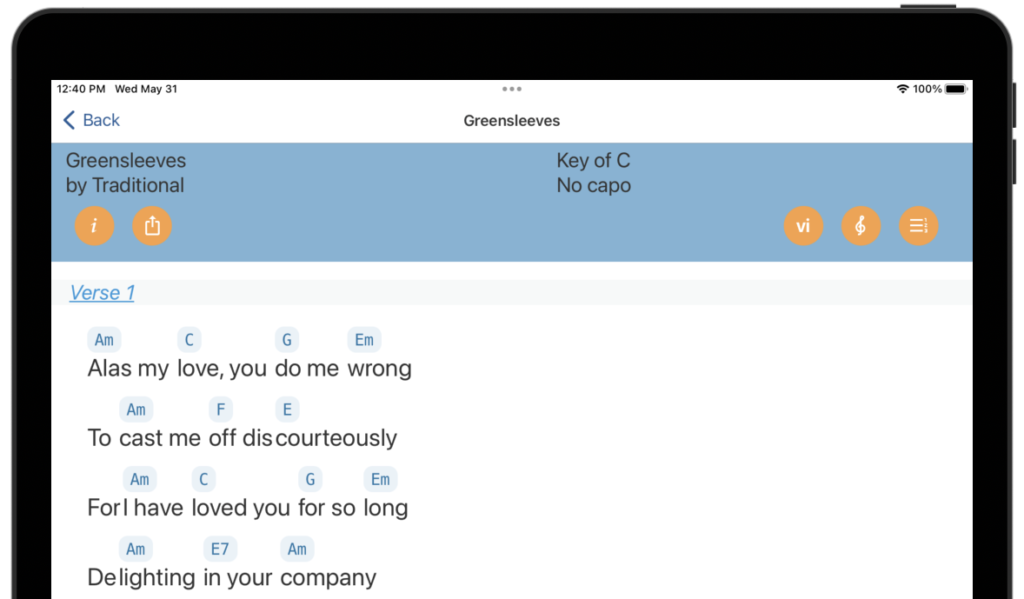
You’ll find buttons to change song information, export the song, toggle between chord names and Roman numerals, transpose the song to a new key, and change the capo position.
Changing Song Information

Press on the i button to bring up the Song Information panel. Here, you can change the song’s Title, Subtitle, and Artist. You can also change the song’s Key and Capo position, however doing so will NOT transpose the song. If you want the chords to be transposed when you change the key or capo, use the Transpose and/or Capo buttons (see below).
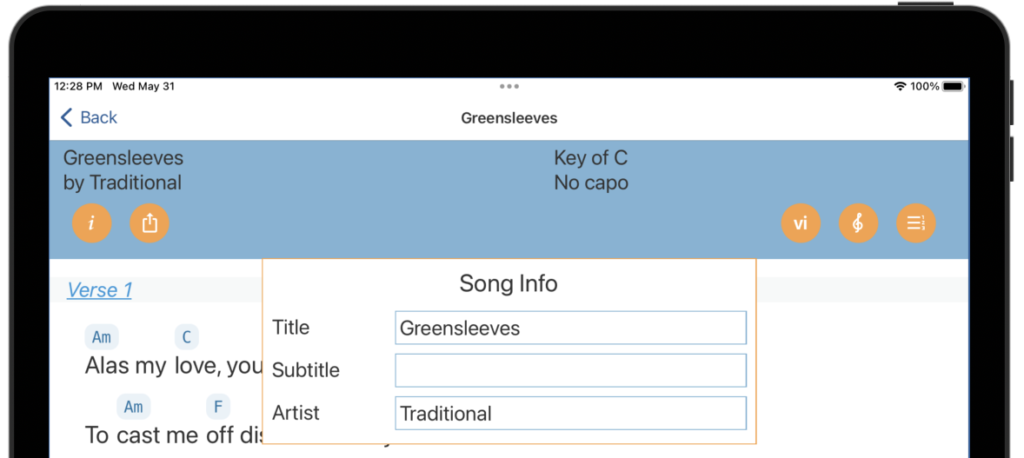
Press anywhere outside the panel to save your changes and return to the Song view.
Displaying Chord Numbers

Press on the vi button to switch the lead sheet to using Roman numerals instead of chord names.
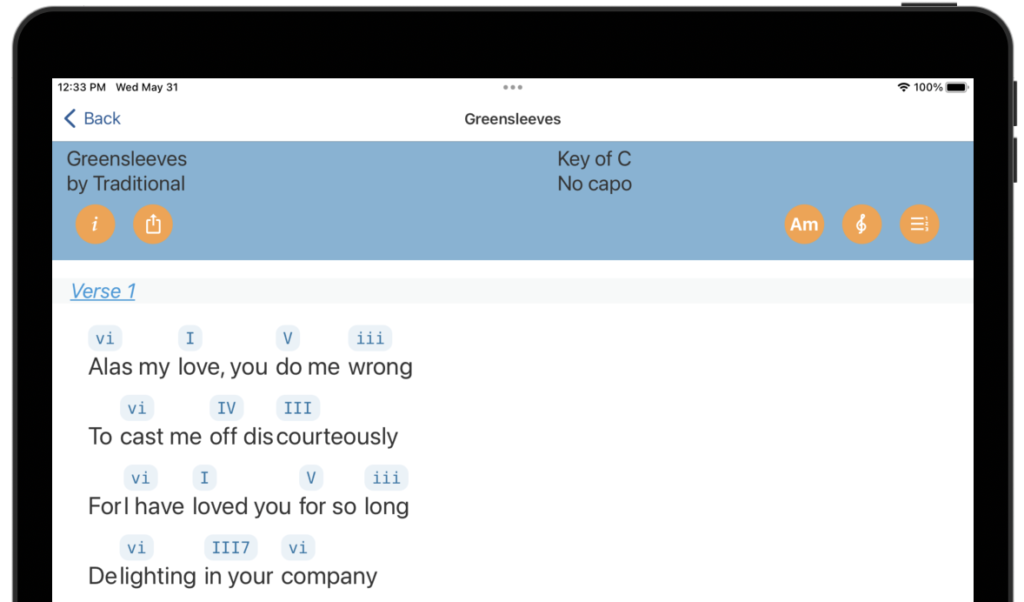
Note that when using Roman numerals for chords, you cannot display chord diagrams.
Changing the Key

Press on the treble-clef button to transpose the song to a new key using the circle-of-fifths control.
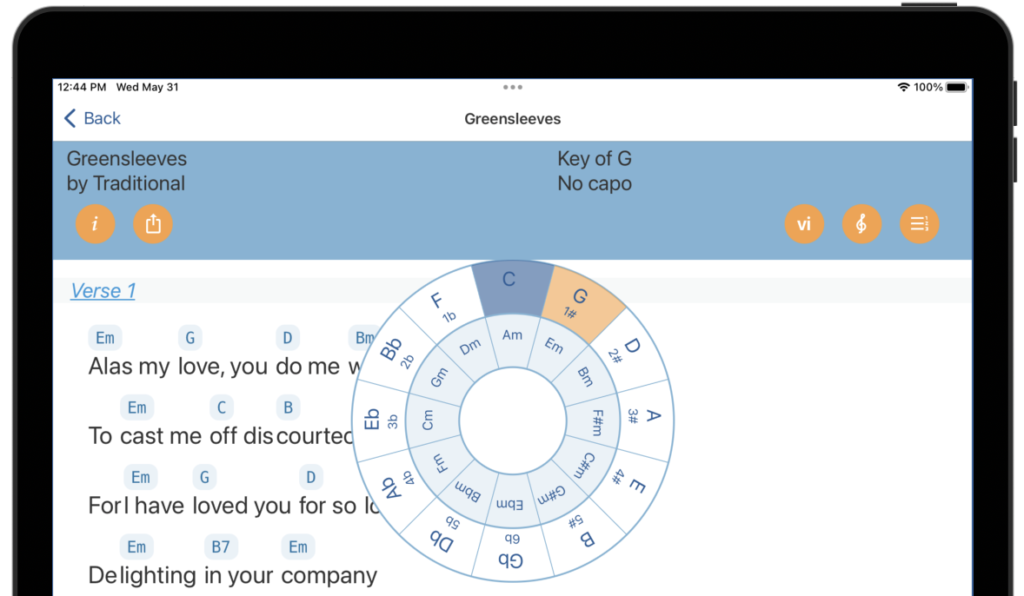
The transpose control displays the circle of fifths with the current key highlighted. Press on any other key to transpose the song to a new key. Note that the original key will be shown highlighted in blue while the newly chosen key will be highlighted in orange.
Also note that the song is transposed instantly in the background. When you are happy with the key change, press anywhere outside the circle-of-fifths to go back to the (newly transposed) Song view.
If you want to change the key without having all the chords change, you can do that in the Song Information panel (press the i button). See Changing the Key or Capo without Transposing, below.
Using a Capo

Press the fret button to change the capo position. A setting of zero mean no capo. Any other setting indicates the fret at which to put the capo.
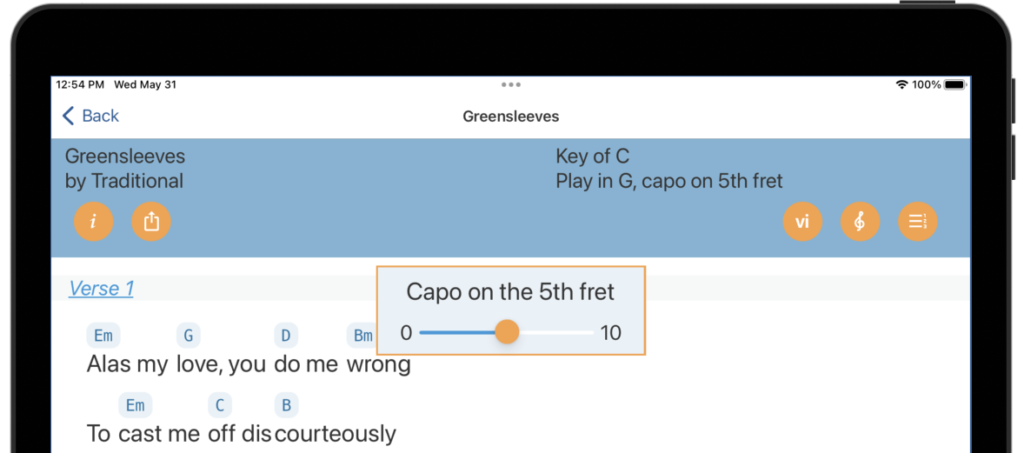
When you add a capo, it changes the chords that are displayed for the song such that the song’s key will be maintained while playing the new chords with the capo on the given fret.
The relationship between capo, key, and chords
The song’s key, capo position, and chords are related. When the key is changed, all the chords are transposed to the new key. Similarly, when the capo is changed the song’s chords must also change in order to preserve the key.
In the example above, the song is in the key of C. With no capo, the first two chords are Am and C. When we change the capo to the fifth fret, all the chords are transposed down by five steps, making those first two chords Em and G, respectively. Playing an Em shape with the capo on the fifth fret will sound as Am.
Changing the key or capo without transposing
You may want to change the key or capo position while keeping all the chords the same. This might be useful if, for example, you create a new song, set the song’s key, and enter all the chords before noticing that you hadn’t set the capo correctly. Or, if you import a song in which the key was incorrectly specified.
Happily, there is a way to change the key or capo position without transposing by using the Song Information panel (see above “Changing Song Information” for more details). In brief:
- Click the
ibutton in the header to bring up the Song Information panel - Change the key and/or capo to whatever you want
- Save your changes and return to the Song View by pressing anywhere outside the panel
The song’s chords will remain unchanged, but the key and/or capo will reflect the changes you made.
Exporting the Song

ParaChord can export songs in ChordPro format as a file with the .cho extension. Click on the button with the Share icon, then share or save.
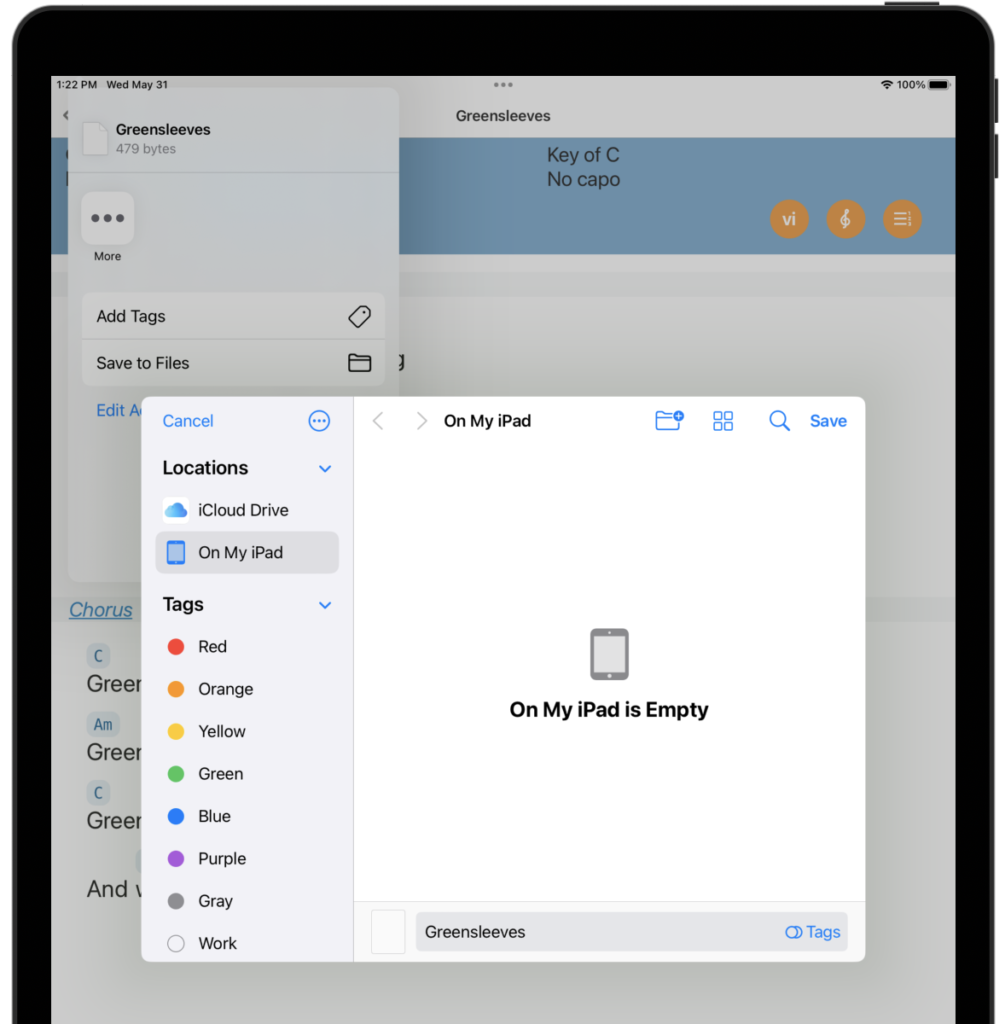
Note that ChordPro is a text format. You can edit the .cho file with any text editor. You can even change the file’s extension to .txt if you prefer.
Editing Songs
There are three ways to edit a Song, all of which are initiated from the Song Screen: Editing a single line, a single section, or the whole song. All of these share common traits:
- When editing, the song is shown in ChordPro format
- Changes are automatically saved when you press any area outside of the line or section being edited, or when you go Back from the Edit Song screen to the Song Screen
Editing a Line
To edit a line, long press on the line you want to change. The line becomes editable and is displayed in ChordPro format.
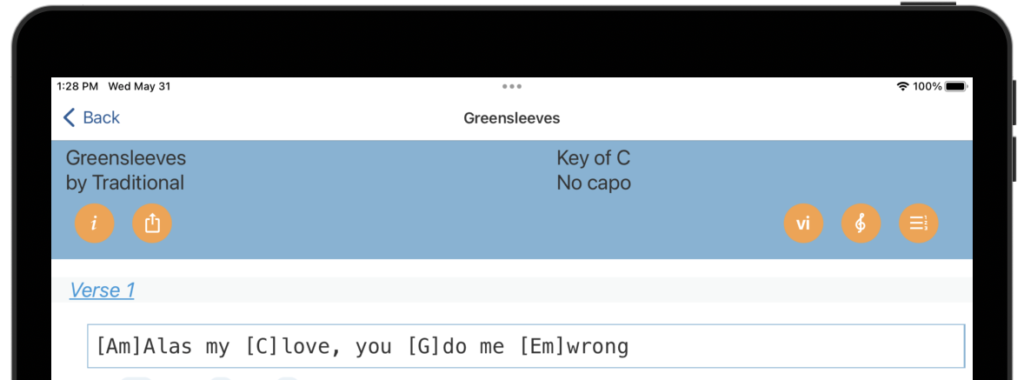
Make any changes you want, then press anywhere outside the editing area to save changes.
Editing a Section
To edit a section, press on the section name (or anywhere in the section header). The section becomes editable. You can change the section name and the section contents (shown in ChordPro format).
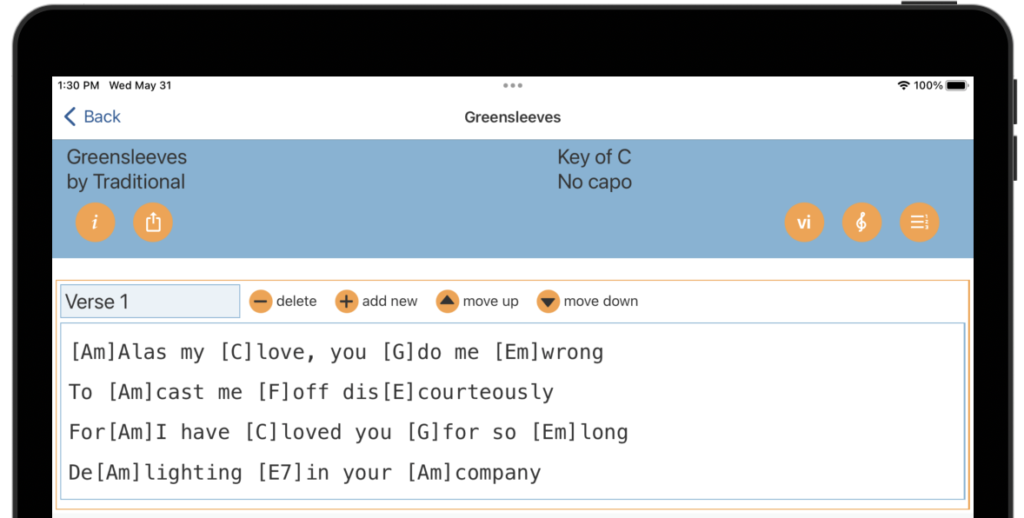
You can also delete the section, add a new section, or move the section up or down relative to the other sections.
When you add a new section, it gets added after the section you are currently editing. Any changes you made to the current section are saved and the new section is automatically selected for editing.
Deleting a section
To delete a section, first select it for editing by pressing the section name. Then press the delete button.
Note that a song must have at least one section, so when you delete the last section, a new, blank section is created and selected for editing.
Editing the Whole Song

Sometimes it’s useful to view and edit the whole song at once. Press the button with the pencil icon at the bottom right of the screen.
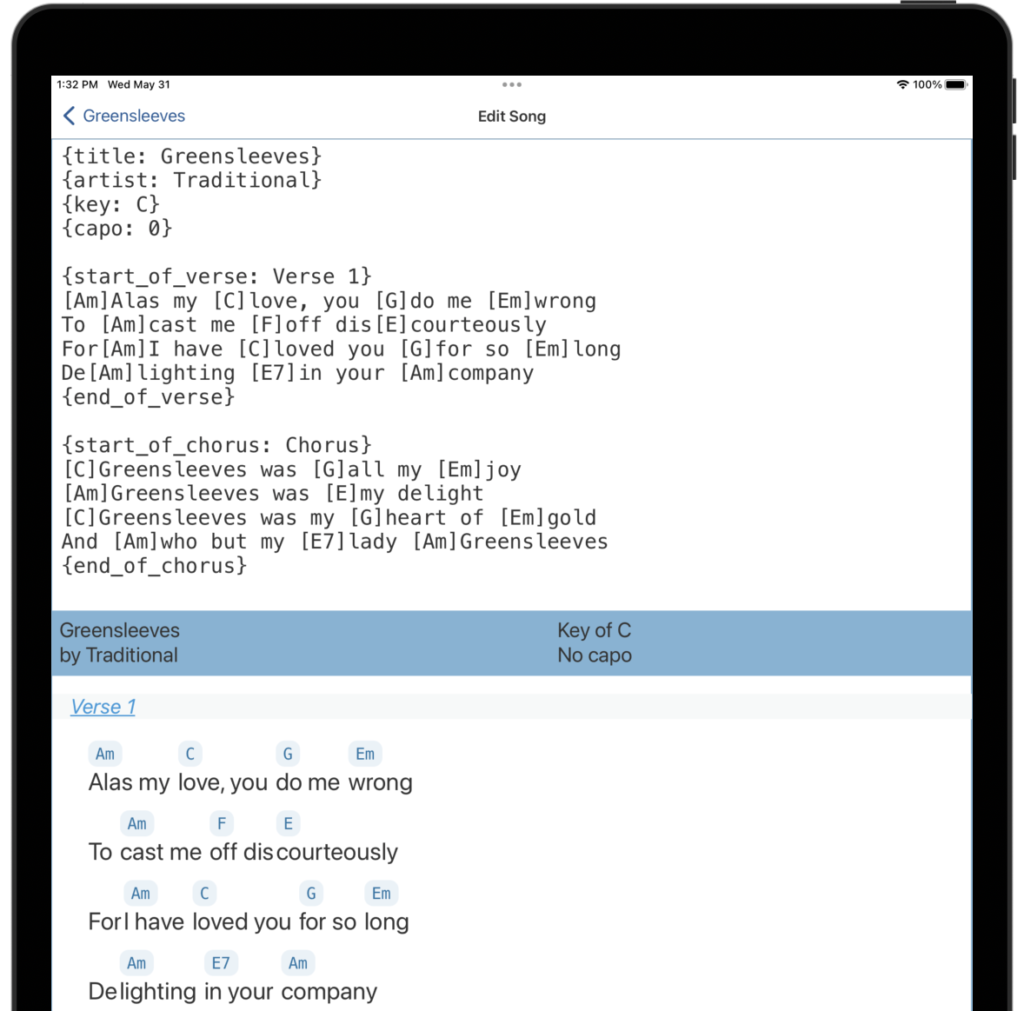
The entire song, in ChordPro format, is shown in an edit pane side-by-side with (or on top of) a preview of the song as it will appear in the Song screen. (On narrow displays, the song preview will be shown beneath the edit pane.)
In the Edit Song screen you are editing the ChordPro representation of the song, including the ChordPro directives. ParaChord supports a functional subset of the ChordPro format.
As you make changes, the preview updates. When you are done editing, press the back button in the upper left to return to the Song view.
Note that you cannot do any editing in the Song preview pane.
Song Metadata
You can edit the song’s metadata, which appear as ChordPro directives at the top of the screen:
{title: San Francisco Christmas}
{artist: Craddock}
{key: F}
{capo: 0}
As you edit the metadata, the Song Information in the Preview updates. Note that changing key or capo will not transpose the song’s chords.
Section Directives
You can create or edit section directives like ‘start_of_verse’ and ‘start_of_chorus’:
{start_of_verse: Verse 1}
[Gm7]This is a [C7]Verse
{end_of_verse}

{start_of_chorus: Chorus}
[F]This is the Chorus
{end_of_chorus}
Monospace lines
ParaChord will use a monospace font for any line that consists of either
- All lyrics with NO chords
- or, All chords with NO lyrics
This is useful for making things line up nicely, e.g., for displaying inline chord diagrams, like this:
{sov: Chord Definitions}
    G 3 2 0 1 0 0
   D7 x x 0 2 1 2
{eov}
The Chord Diagram Screen
ParaChord has over 1,000 built-in chord-diagrams, and you can create and edit your own.
From the Song List screen, press on the menu in the upper left and choose “Chord Diagrams”. You’ll be take to a screen that shows all the chord diagrams, arranged by key.
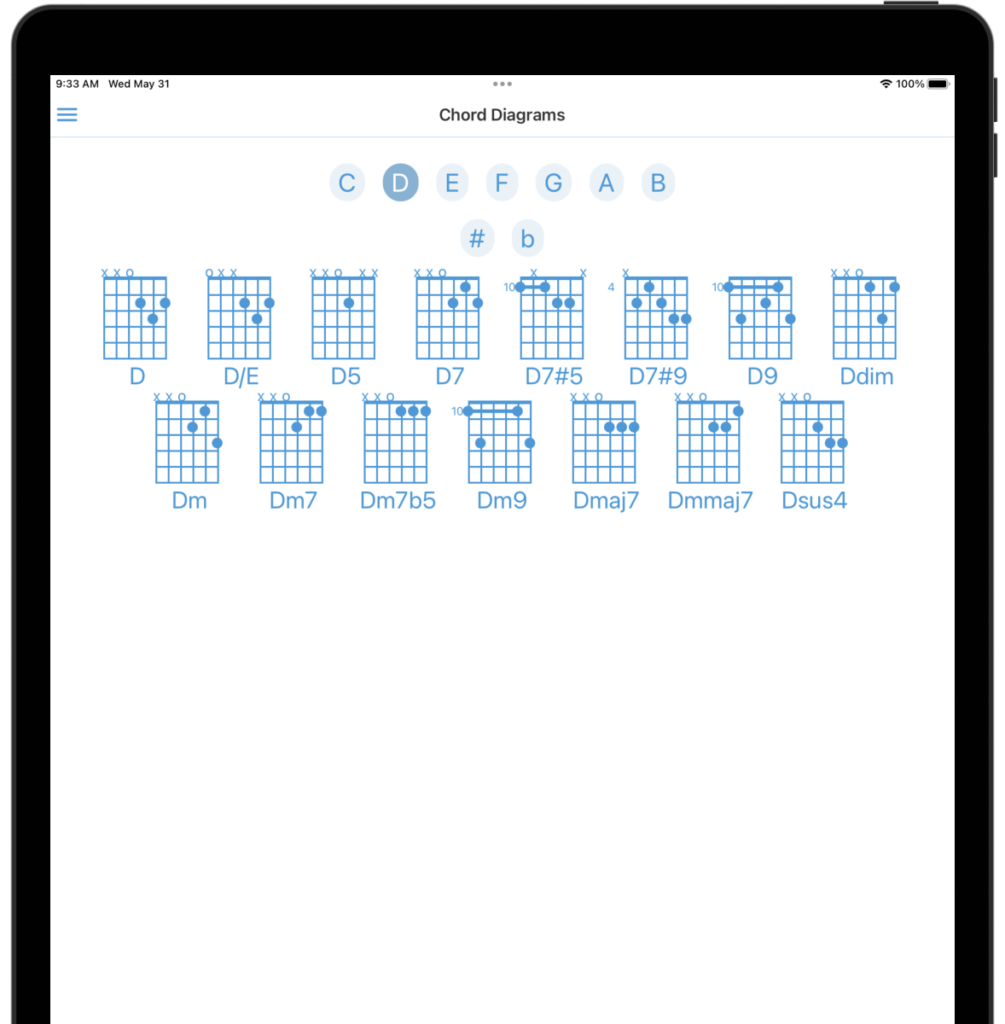
Along the top of the screen, you’ll see all the keys (C, D, E, F, G, A, B), and just below you’ll find the sharp a flat symbols (#, b). Select a key, with or without # or b, to see all the chords for that key.
You may have multiple chord diagrams for the same chord, allowing you to use multiple shapes for the same chord. For example, the A chord has these shapes:

You can edit a chord diagram just by pressing on it, or create a new diagram by pressing on the + button in the lower right. Either action will bring up the Digram Editor.
Naming a Diagram
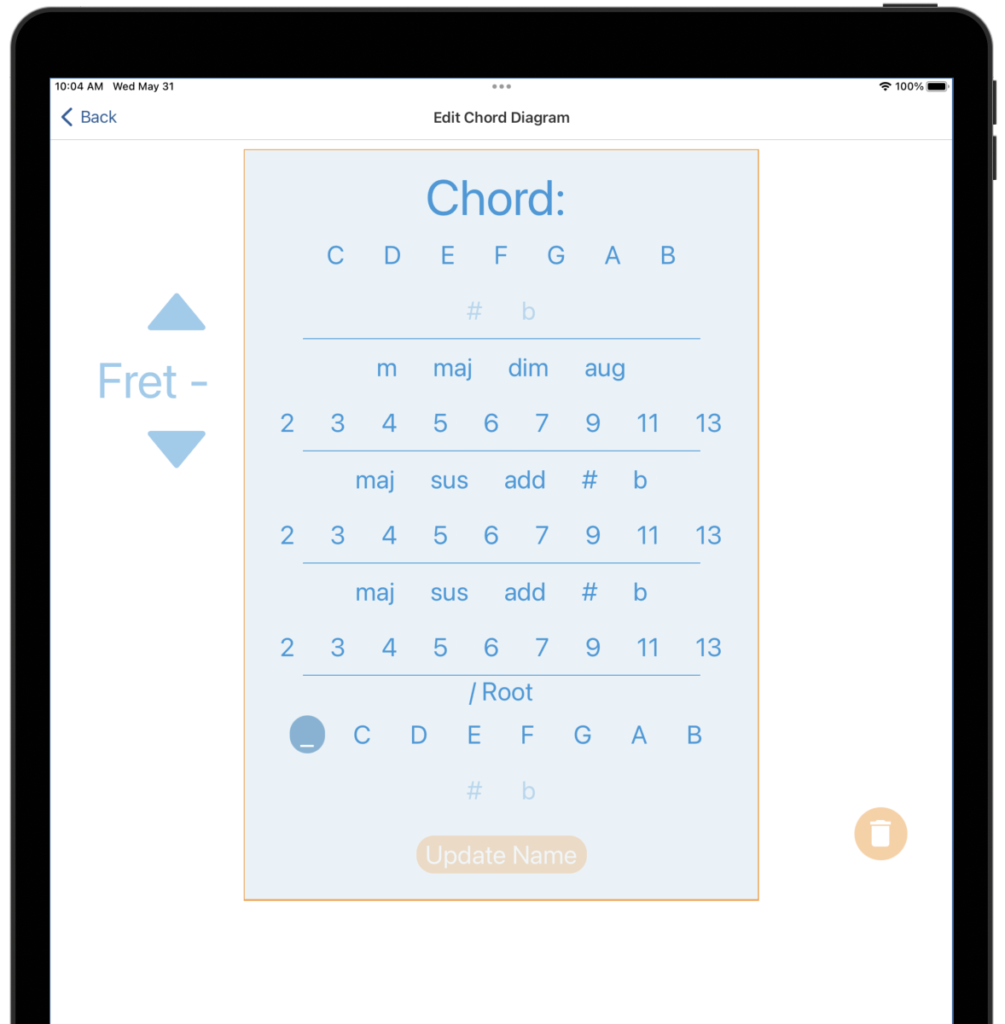
From the Diagram Editor you can name (or rename) the chord just by tapping on the chord’s name at the top of the screen (e.g., “Chord: Dsus2”). When you are creating a new diagram, the name change panel comes up automatically (see the second image, above).
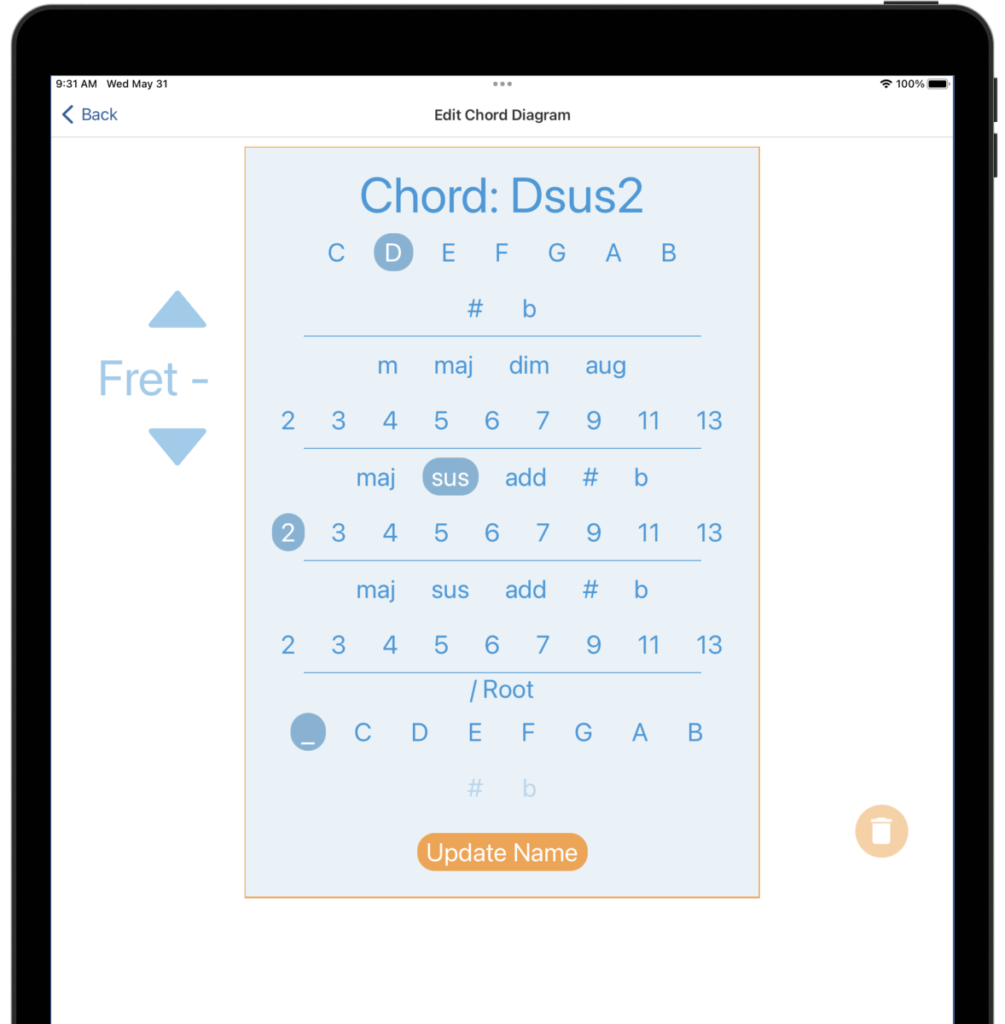
To understand the name change panel, just read it from top to bottom. Each section allows you to specify part of the chord name. From top to bottom these are the:
- required chord base (
C, D, E, F, G, A, Band#orb) - optional chord qualifiers (
m, maj, dim, aug) - two sections of optional chord extensions (
maj, sus, add, #, b) - optional root for slash chords (
C, D, E, F, G, A, Band#orb)
In the example above, we’ve named the chord “Dsus2”, as follows:
- 1st section: The chord base “
D“ - 2nd section: no qualifier
- 3rd section: the extension “
sus2“ - 4th section: no additional extension
- 5th section: no root (not a slash chord)
ParaChord disallows illegal chord names.
When you are happy with the chord name, press “Update Name” at the bottom of the panel to return to the diagram editor.
Editing a Diagram
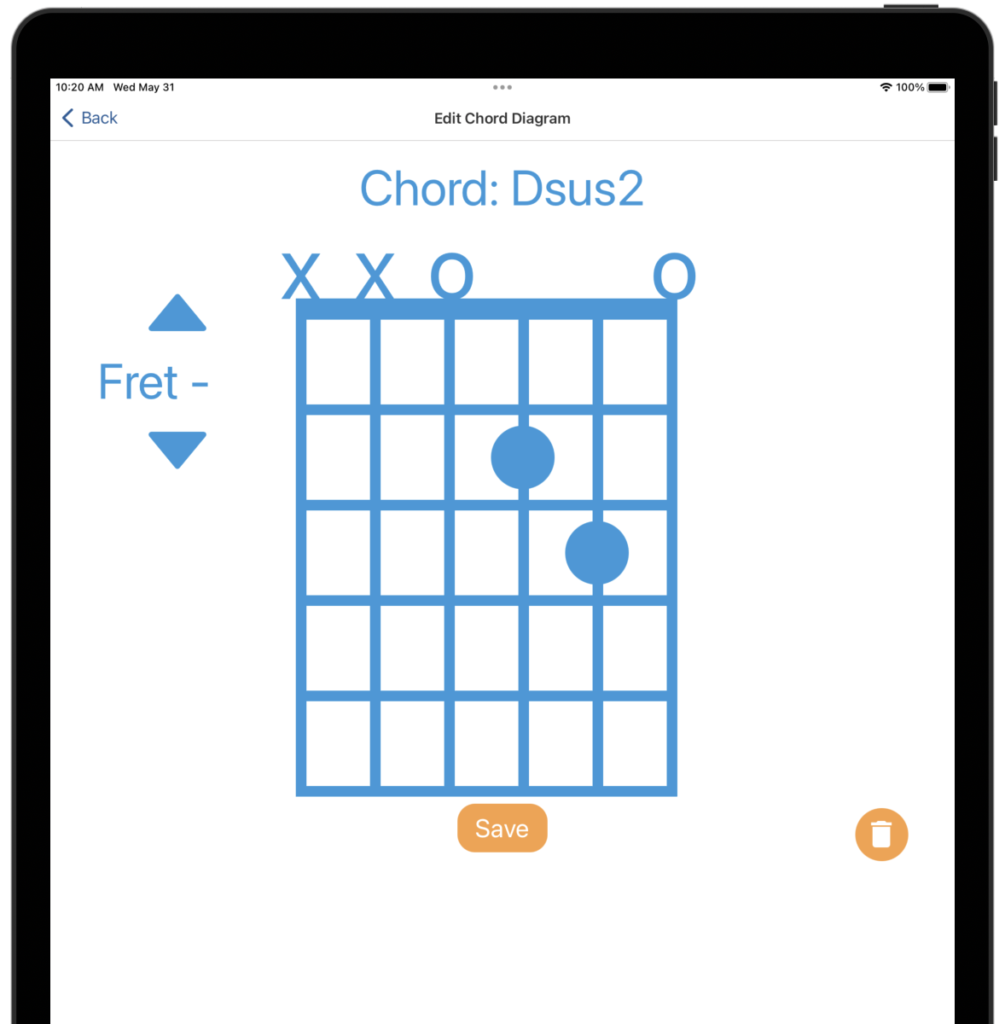
The second image above shows the Diagram Editor, displaying a chord diagram with horizontal frets and vertical strings. You can press any fret/string crossing to indicate how that string should be played. You can press the “o” and “x” symbols at the top of the diagram to indicate that a string should not be voiced (x) or should be open (o).
You can also change the starting position along the neck for this chord by increasing or decreasing the fret number on the left. Note that pressing the down arrow increases the fret number (as the chord is played farther down the neck).
When you are happy with your changes, press the Save button at the bottom to save your chord diagram.
Deleting a Diagram
To delete a chord diagram, select it from the Chord Diagrams screen which will bring up the Diagram Editor. Press the trash can icon in the lower right to delete the diagram.
Appendix
ChordPro Directives
ParaChord supports the following ChordPro Directives:
{title: The Title}
{subtitle: The SubTitle}
{artist: Artist name}
{key: Song Key}
{original_key: Song Key}
{capo: Capo Position}

{start_of_chorus: Chorus Name}
{end_of_chorus}
{start_of_verse: Verse Name}
{end_of_verse}
{start_of_bridge: Bridge Name}
{end_of_bridge}

{start_of_grid left+cells+right Name of Grid}
{end_of_grid}
Notes on Importing
ParaChord can import lead sheets from various sources, including several web sites. There are two ways to import:
- By copying the text from the source, e.g., from a ChordPro text file
- By copy the URL from a site that ParaChord understand
In either case, once you go to the Import Screen and press Import Now, ParaChord will attempt to read the text from the clipboard and interpret it as a lead sheet or a URL to a lead sheet.
If ParaChord is successful in interpreting the source as a lead sheet, it will show the song’s name and ask if you want to import it to your Song List.
ParaChord won’t always get everything right, and you may need to fix up the resulting lead sheet by editing the song after import.
Important: It is up to you to comply with all copyrights and terms and conditions of the sources that you import into ParaChord.