Overview
Plan Your Sail lets you quickly see predicted Tide and Current conditions along a pre-defined route at different Dates and Times. This helps you quickly pick the best date and time to take a particular sailing trip, or alternately, to pick the best trip for a specific day.
FAQ
Check out the FAQ for Plan Your Sail
The Transit List
The “Home” screen for Plan Your Sail is a list of Transits. Think of a Transit as a template for a trip you plan to take. It defines where you will go, but not when.
On the Transit List Screen, you can create new Transits, edit Transits, delete Transits, and, of course, select a Transit for planning a trip.
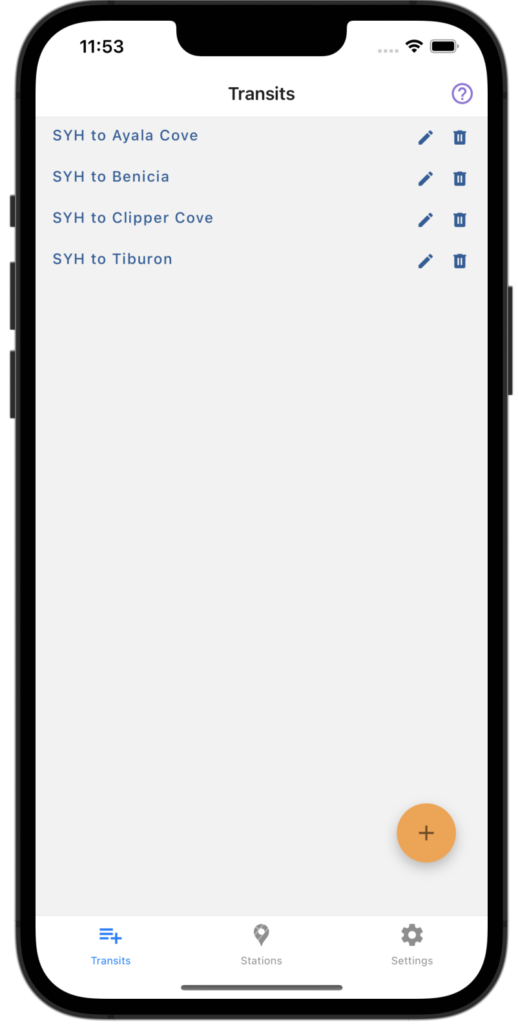
Note that you can also navigate to the other main screens from here: the Stations screen and the Settings screen. We’ll go over them later.
A Quick Tour
Transits are at the heart of Plan Your Sail – they define the trips you plan to take. The App comes with a couple of pre-defined Transits for you to play with. Select the first one “SYH to Ayala Cove”. Press on the date at the top, and change the date to May 20, 2023, then change the time to 12:30pm (PST).
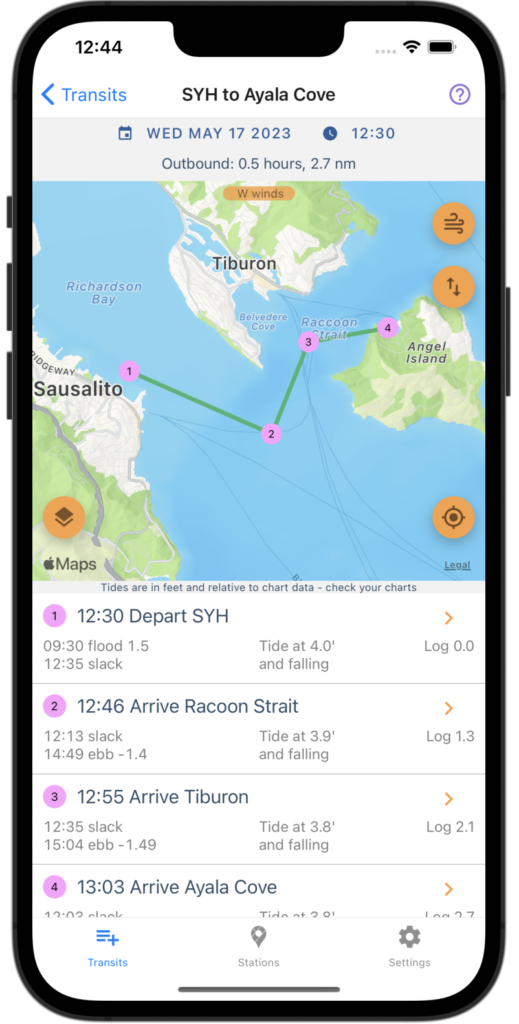
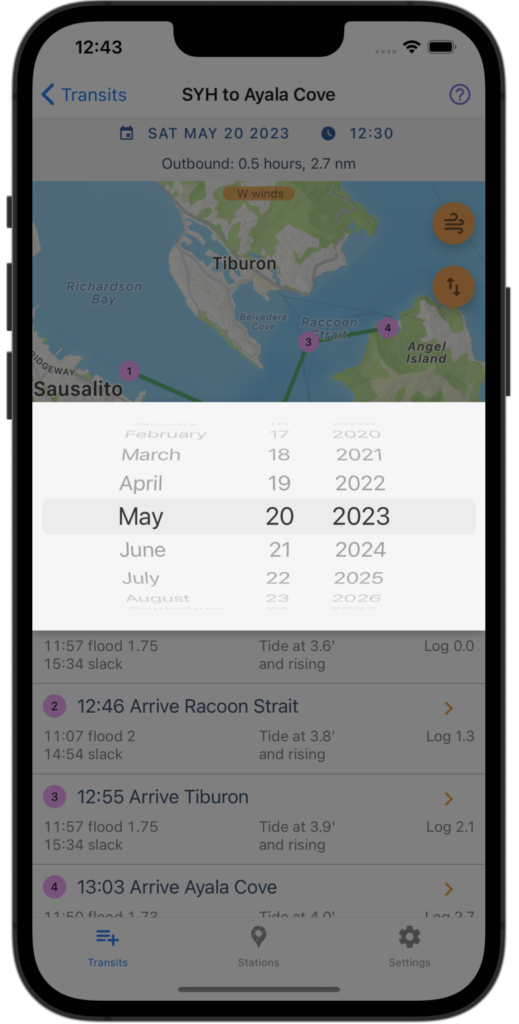
The Purpose of Plan Your Sail is
to show Tide and Current predictions for a specific Date and Time for each Waypoint along a Transit, and make it easy to change the Date and Time for your trip
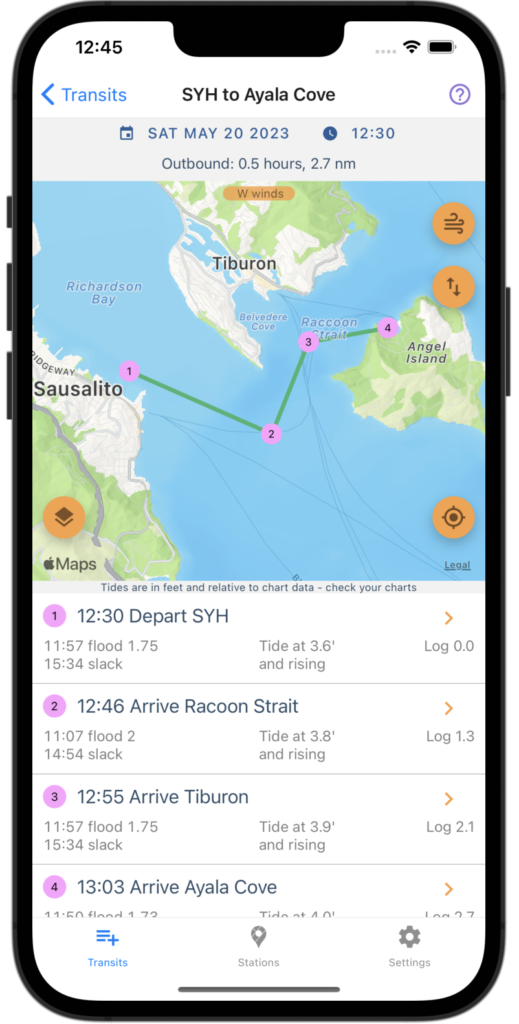
Let’s unpack this a bit. We’ll focus on the third image above, after we changed the Date for our trip to Saturday, May 20th, 2023.
Remember that a Transit is just a template for a trip you want to take. The Transit above is from SYH (Sausalito Yacht Harbor) to Ayala Cove. We’re using that template to define a trip on a specific date and time, in this case, Saturday, May 20th, 2023, at 12:30pm.
Note: The app may display different results if you choose a different date/time or are in a timezone other than PST.
A Transit is a series of Waypoints, and a Waypoint is just a named location. In our Transit above, we see four Waypoints in order:
- SYH
- Racoon Strait
- Tiburon
- Ayala Cove
Those Waypoints define each Leg of the trip, a Leg simply being the journey between two Waypoints. Plan Your Sail calculates the time it will take you to sail between each Leg using the departure Date and Time and the speed of the boat (which can be changed on the Settings Screen).
So, looking at the first Leg which appears just below the map, we see that we will
- Depart SYH on Saturday, May 20, 2023 at 12:30 – that’s the Date and Time that we set at the top of the screen
- Arrive at our second Waypoint, Raccoon Strait, at 12:46, having logged 1.3 nm
Plan Your Sail shows a summary of the conditions at each Waypoint for the specific time that we will arrive at the Waypoint. For the second Waypoint, Raccoon Strait, it shows:
- A prediction for the Currents, in this case, a 2 knot flood at 11:07 and Slack tide at 14:54
- The Tide predictions, in this case, a rising tide of 3.8 feet
That’s all there is to it!
The usefulness of Plan Your Sail lies in its ability to quickly change the Date and Time of your trip and instantly see updated predictions for Tides and Currents at each Waypoint along your journey.
One more thing: All of the changes to make on the Transit screen are saved, so you can pick up where you left off when you come back to the transit.
Now, go Back (upper left) to the Transit List screen and use the following sections to learn how to create your own Transits and use them to plan trips.
Creating a New Transit
From the Transit List, click on the + icon in the lower right of the screen to create a new Transit. This takes you to the Transit Builder where you can define the template for your trip.
As you build your Transit, the Transit is automatically named and saved. You can go back to the Transit list at any time and your new Transit will be there. The name of your Transit is created from its first and last Waypoint, e.g., “SYH to Clipper Cove”.
Editing a Transit
From the Transit list, click on the pencil icon to the right of the Transit you wish to edit. You will be taken to the Transit Builder screen to make changes to your Transit.
Deleting a Transit
From the Transit list, click on the trash can icon to delete a Transit. You will be asked to confirm the deletion.
The Transit Builder
The Transit Builder screen is where you define the template for your trip, called a “Transit”. A Transit is just a series of Waypoints, each of which is a named location.
Creating a Waypoint
To create a new Waypoint, long-press on the map where you want the Waypoint. That’s it. The Waypoint is created and automatically named. If the Waypoint is near a Tide or Current station, it is named for that station. Otherwise, it is just given an unique name like “Waypoint 1”.
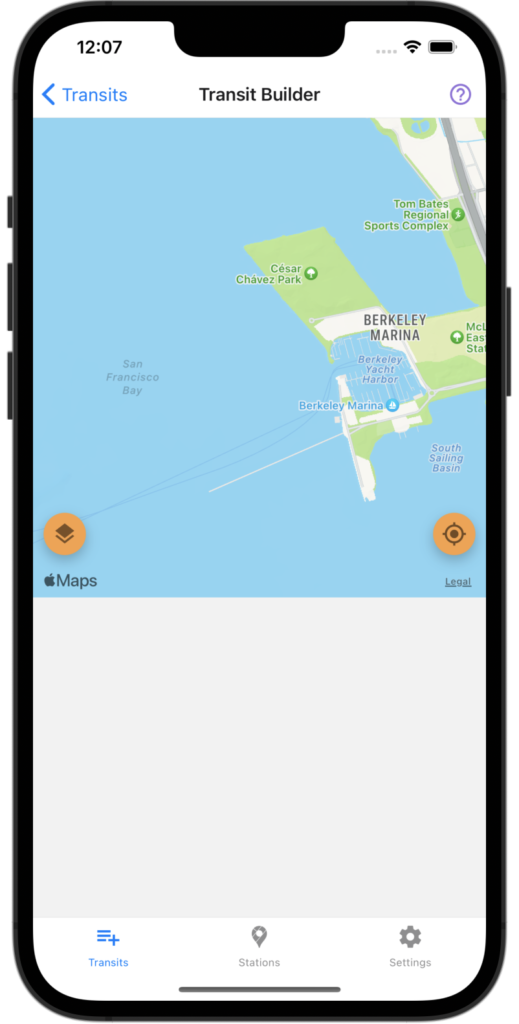
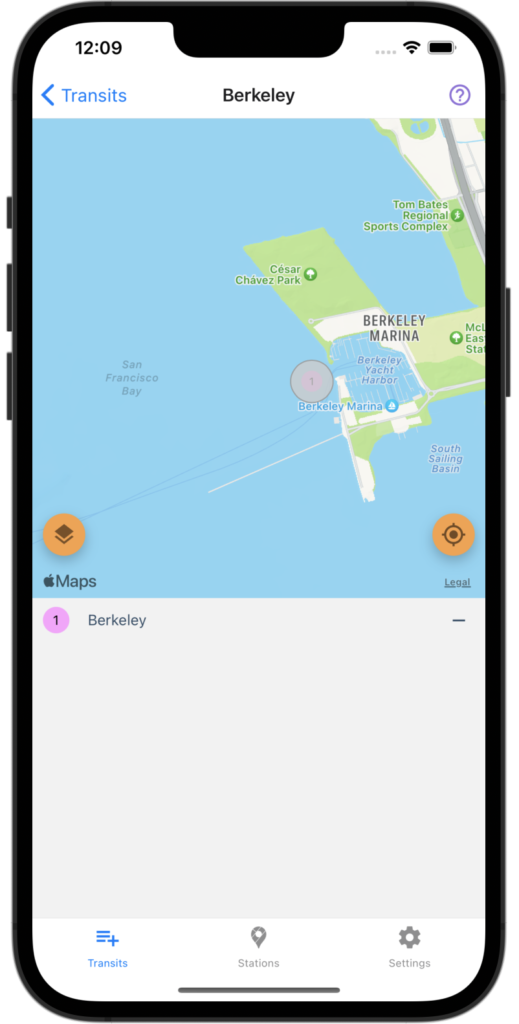
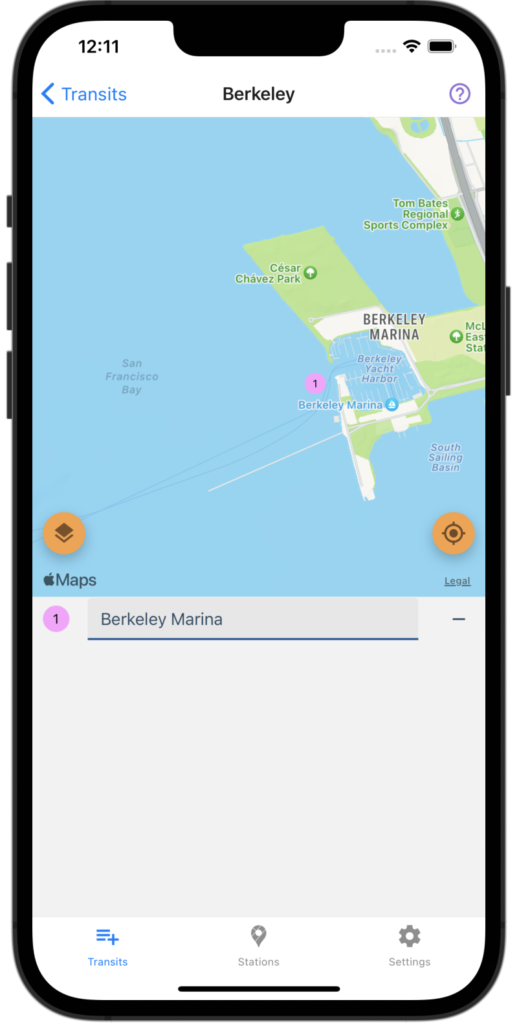
Note that the new Waypoint is automatically added to your Transit (you see it in the list below the map). Waypoints in your Transit appear, numbered and in order, at the top of the list below the map.
Naming the Waypoint
Press on the Waypoint’s name, and you can edit it to be anything you want. You can do this at anytime after a Waypoint has been added to your Transit
Adding an existing Waypoint
Once a Waypoint has been added to any Transit, it becomes available for use in all other Transits. Existing Waypoints appear, lettered, on the map and in the list below the Waypoints already added to your Transit. To add an existing Waypoint to your Transit, just press on the + sign next to the Waypoint’s name in the list.
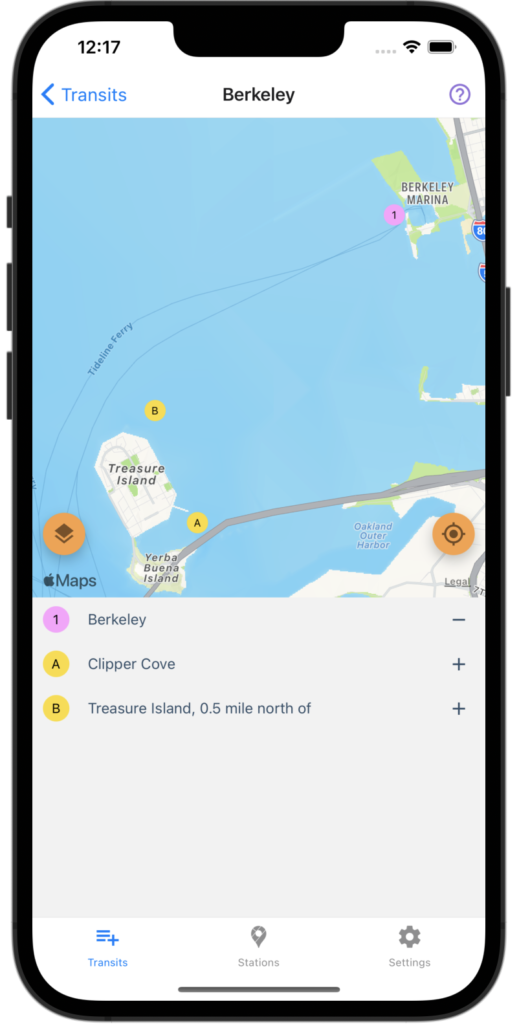
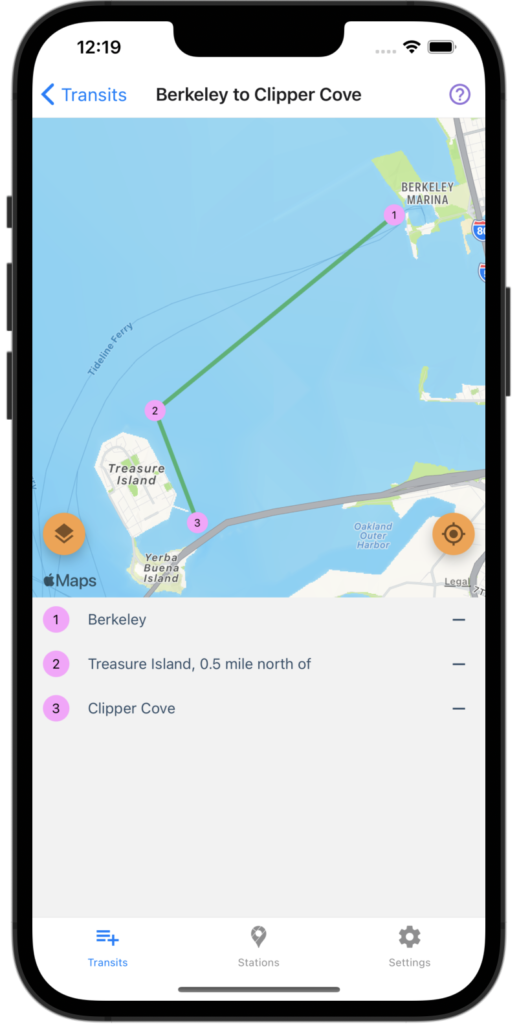
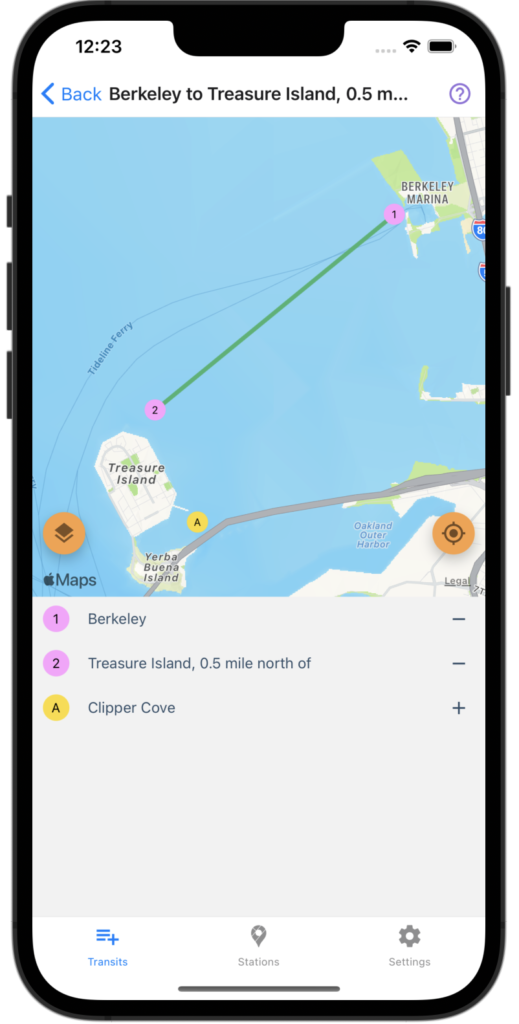
As you add either new or existing Waypoints to your Transit, Plan Your Sail will connect them, in order, with lines on the map.
Removing a Waypoint
To remove a Waypoint from your Transit, simply press the - sign next to the Waypoint’s name in the list. The Waypoint will be removed from the Transit, but will still appear in the list as an existing Waypoint that is available to add.
Moving a Waypoint
Unfortunately, Waypoints cannot be moved once they are created. If you need to move a Waypoint, you have to remove it from the Transit then create a new Waypoint.
Waypoints also cannot be reordered within the Transit. That means that if you need to move a Waypoint in the middle of your Transit, you need to remove it and all waypoints after it in order to create a new Waypoint in the correct place.
Moving and Reordering Waypoints is definitely on the list of things to add!
Saving the Transit
Transits are automatically named (or renamed) and saved as you edit. A Transit’s name is built from the first and last Waypoint, e.g., “SYH to Clipper Cove”.
You can go back to the Transit list by pressing Back in the upper left of the screen, and your new (or newly-edited) Transit will be there.
Using a Transit
In the Quick Tour, above, we learned the basics of how to use a Transit. Now, we’ll dig a little deeper.
Setting the Date and Time
A Transit is a template for a trip which can be taken on any date and time. Once you select your Transit from the Transit List, you can modify the date and time of departure in order to see Tide and Current conditions all along the transit for that particular date.
Generally, you know what you’re looking for: favorable currents for reaching a destination, a high enough tide to get into a shallow area, or a low enough tide to go under a bridge.
You can quickly find the right date and time to satisfy the particular needs of your transit.
The Date and Time for the Transit are saved with the Transit itself, so you can pick up where you left off whenever your return to the Transit.
Reading the Conditions at each Waypoint
Once you’ve set the date and time, you can see conditions at each WayPoint.
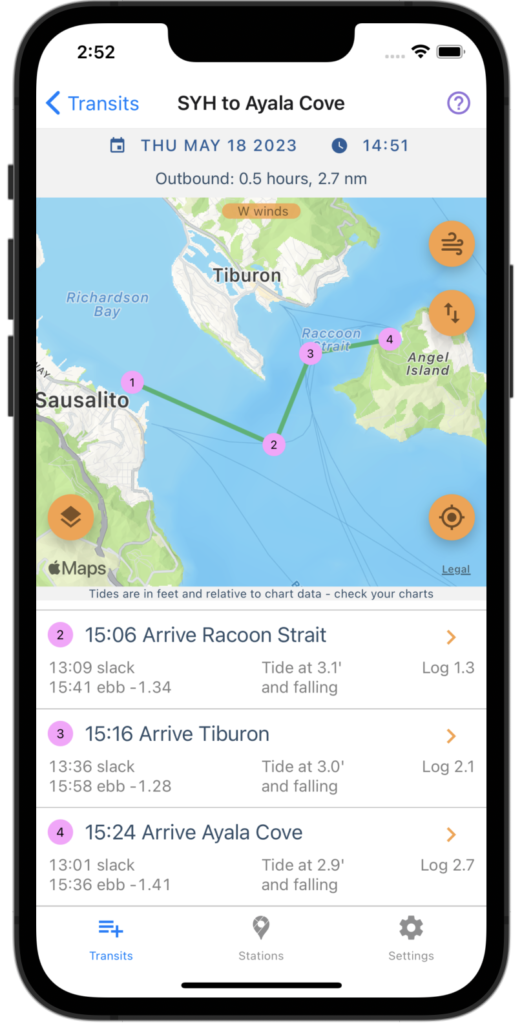
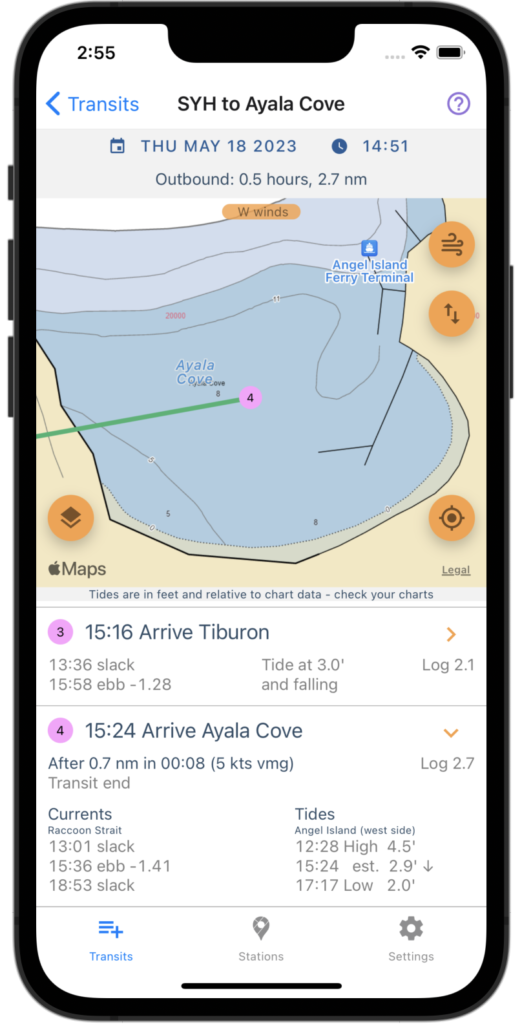
In the leftmost image, we see the full Transit and the conditions at each WayPoint (we’ve scrolled down the list of WayPoints until we can see the Arrival at Ayala Cove).
For each WayPoint, we see:
- The arrival time
- The log (cumulative distance since the Transit start) in nautical miles
- What the currents are doing before and after the arrival time
- The estimated tide and whether the tide is rising or falling
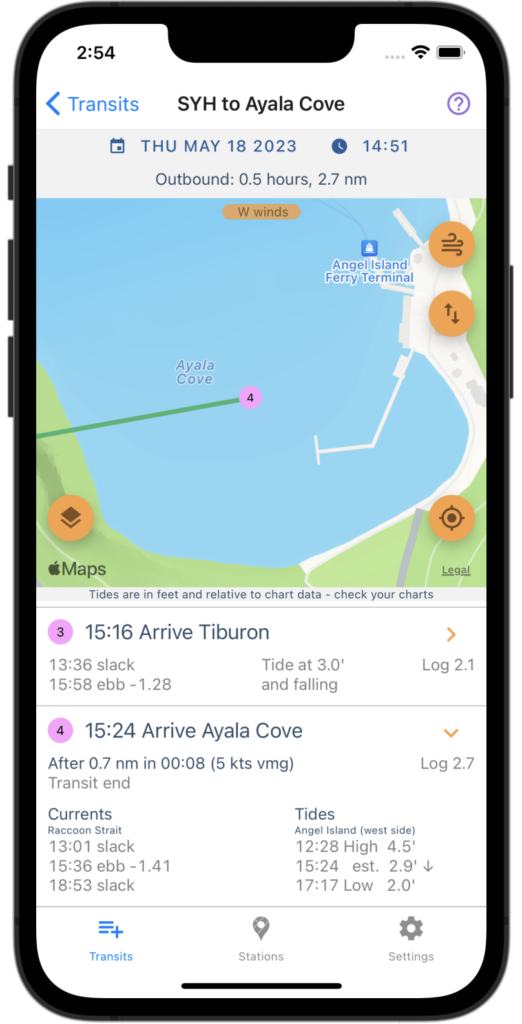
In the middle image, we’ve zoomed the map into the last WayPoint, at Ayala Cove, and we’ve expanded the last WayPoint to show more detail.
We can now see additional information, including:
- The distance travelled since the last Waypoint (0.7nm)
- The time elapsed since the last Waypoint (8 minutes)
- The velocity made good (VMG), based on our boat speed (5 knots)
- Additional Current predictions, and the Current Station that was used to get the predictions, “Raccoon Strait”
- The High and Low tides surrounding our arrival time, and the Tide Station that was used to get the predictions, “Angel Island (west side)”
Note: If you’re using an iPad or larger phone, you might want to always expand the details in the Transit view – you can do this in Settings->Options
In the right-most image, we have turned on the Chart overlay in order to see charted depths in Ayala cove. You can do this by pressing the overlay button in the lower left of the map, then pressing the topmost of the three buttons show, which toggles the chart overlay on and off.
Changing the Wind Direction
When we’re sailing, wind direction can affect our Transit. In particular, if we’re sailing upwind, we can’t sail directly to our destination; we have to tack back and forth.
Plan Your Sail attempts to take this into account when calculating velocity made good (VMG) by providing the following settings
- Your boat’s speed (Settings->Boat Settings->VMG)
- Your boat’s “upwind factor” which is used to derate your boat’s VMG when on an upwind leg (Settings->Boat Settings->Upwind Factor)
- Your boat’s minimum angle to the wind when close hauled (Settings->Boat Settings->Minimum Angle to Wind) which is used to determine when you’ll be tacking back and forth
Finally, the wind direction itself. Since this can vary for each transit, the wind direction is set on the Transit screen itself.
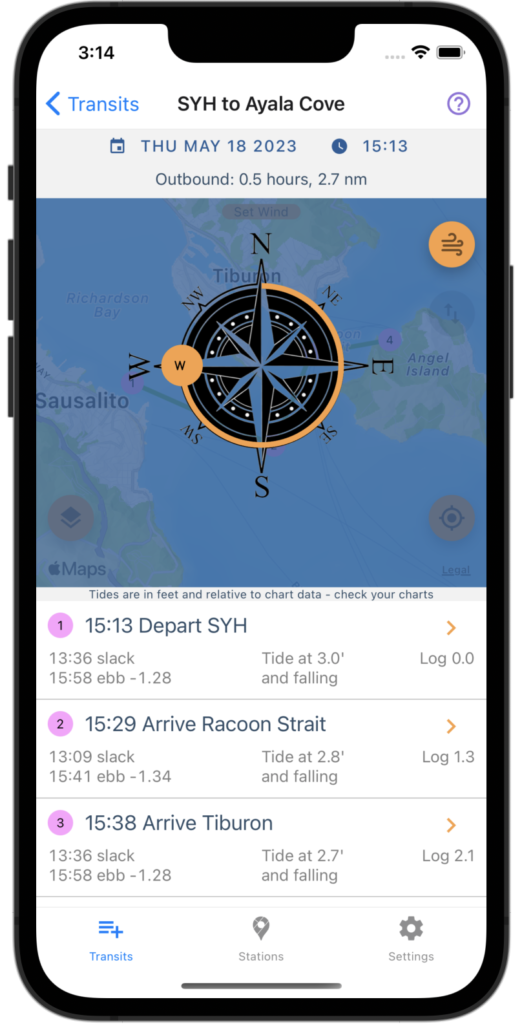
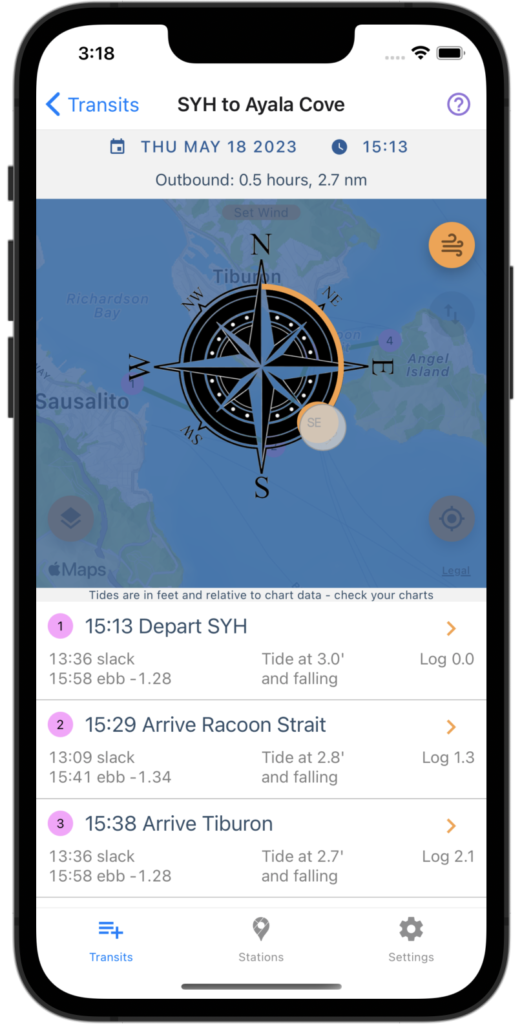
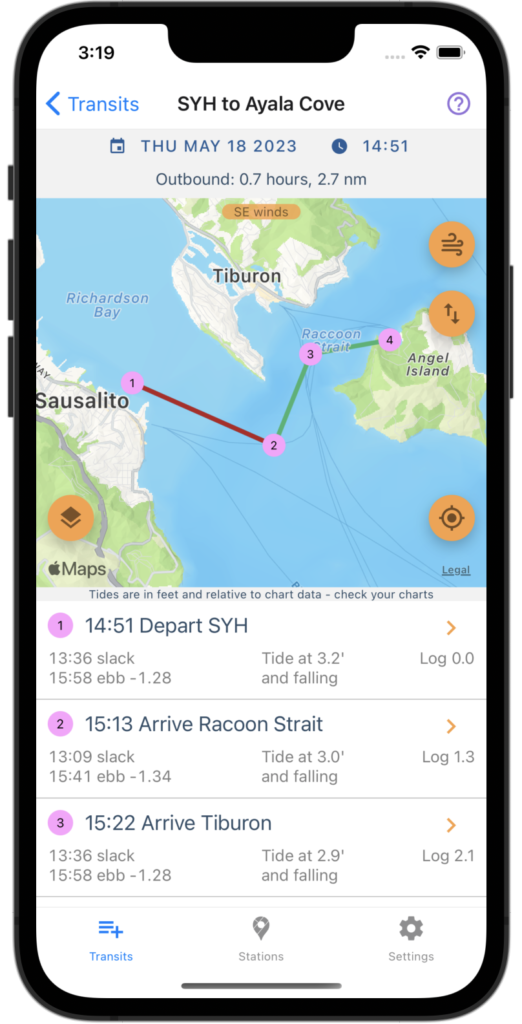
To set the Wind Direction, press on the Wind icon in the upper right of the Map (left image). Next, press and hold the circle indicating wind direction on the compass (middle image). While continuing to press, “dial in” the desired wind direction. Finally, press the Wind icon again which will close the panel (right image). Note that the wind direction is shown in the upper middle of the map (in this case, “SE winds”).
Note that in the rightmost image, the first leg of our transit turned red. That indications that this will be an upwind leg, that we’ll have to tack to make way, and that our VMG will be derated by the “upwind factor” in our Boat Settings.
Reversing the Transit
You’ll often be planning round-trip sails – sailing to a destination, hanging out a while, then sailing back. Plan Your Sail makes that easy.
Once you’ve selected a Transit and set the date and time for the trip, you can Reverse the Transit, and set a new date and time for the return trip. This makes it easy to plan a lunch stop, an overnight trip, or even to plan to stay several days at the destination before returning.
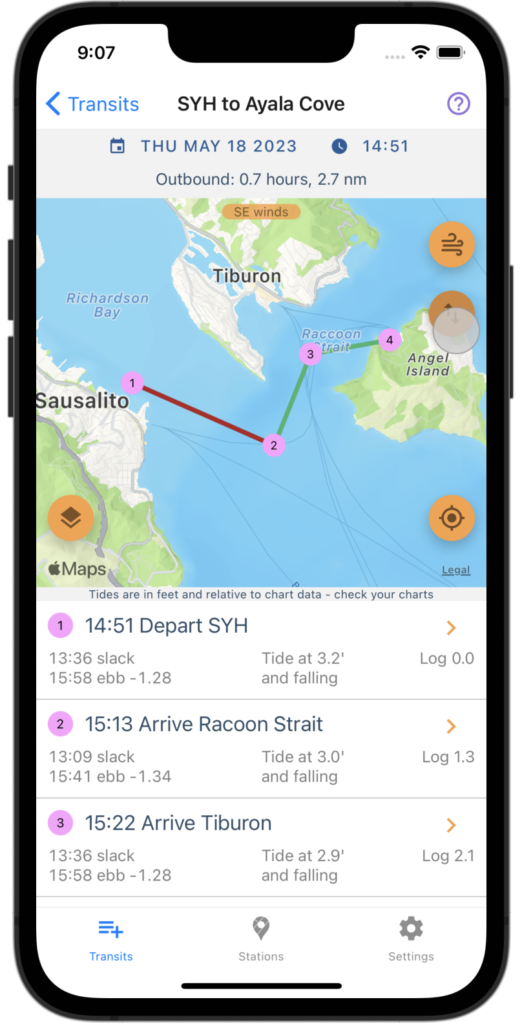
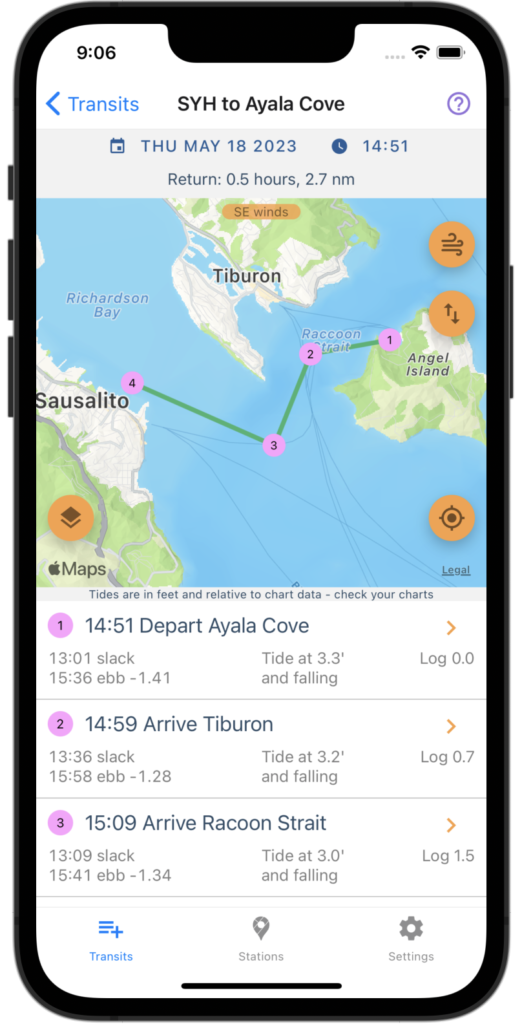
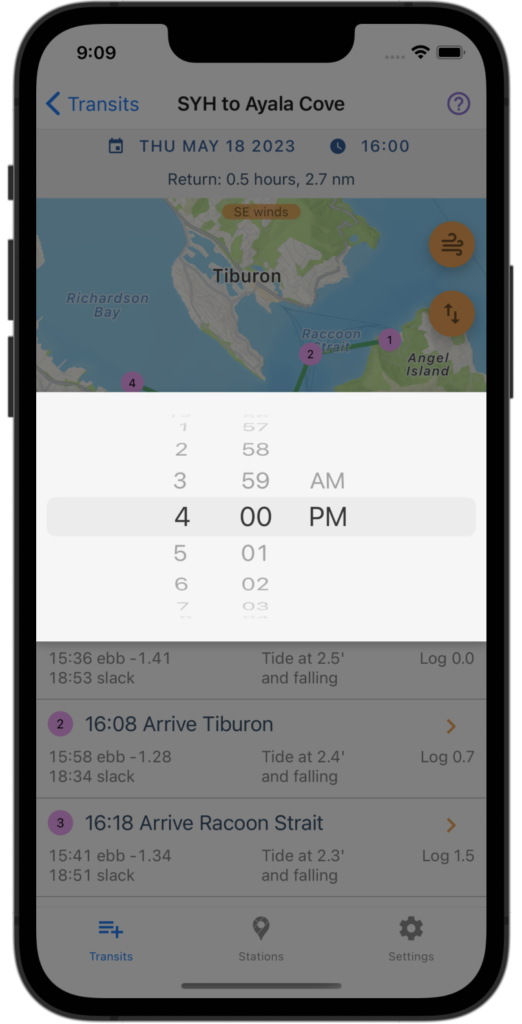
You’ll recall that the trip Date and Time are saved with the Transit so that you can always come back to the Transit and pick up where you left off. Plan Your Sail actually saves two sets of Date/Time: one for the outbound trip and one for the return.
Whenever you change the outbound Date/Time, the return Date/Time is automatically set to the arrival time at the last Waypoint, as if you were sailing to the destination, then immediately returning.
When you change the Date/Time for the return trip, the outbound Date/Time is not changed. So, the procedure is generally:
- Select a Transit
- Set the outbound Date/Time, and adjust until you’re happy with the conditions shown
- Reverse the Transit
- Set the return Date/Time, and adjust until you’re happy with the conditions
You now have a round-trip Transit, and you can see conditions for both the outbound and return journey just by toggling the Reverse button.
Using Overlays
Plan Your Sail can display two different overlays: NOAA Charts, and Tide and Current stations.
Displaying NOAA Charts
You can display NOAA charts as an overlay to show information including depths along your route, and use this along with the tide information shown at each Waypoint to determine if your plan works.
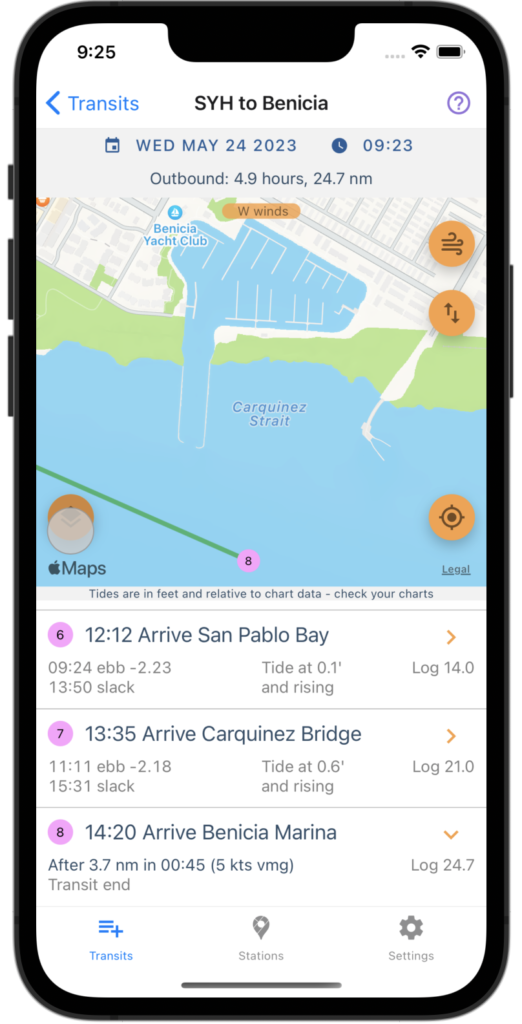
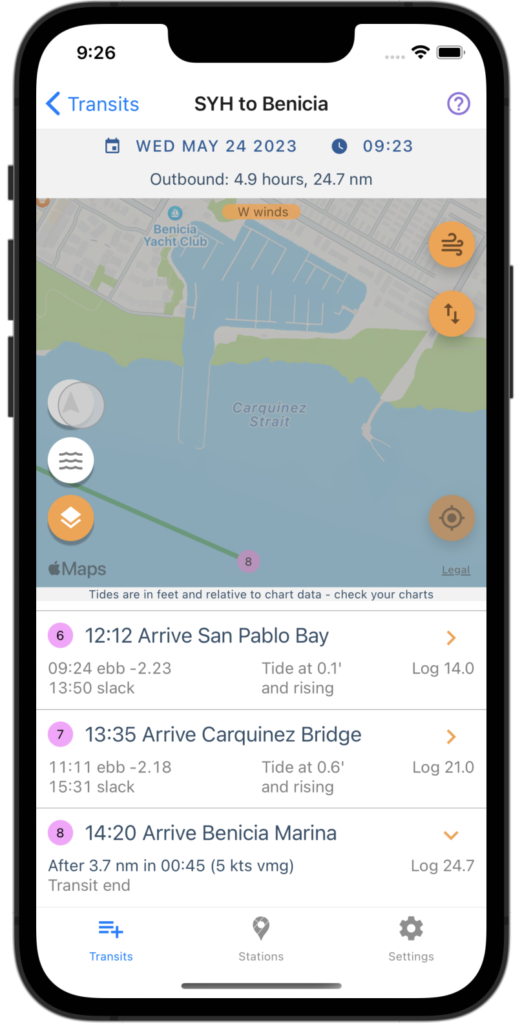
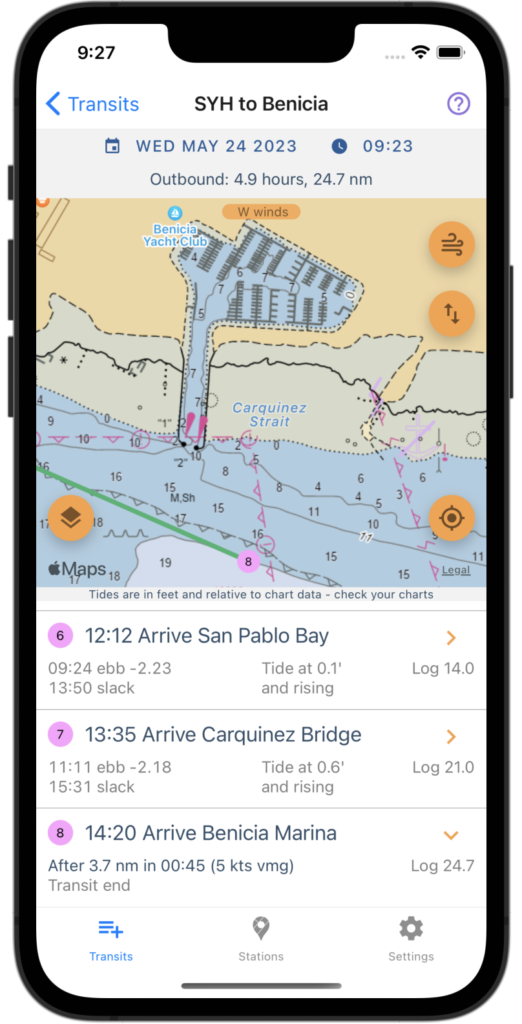
Remember that it is your responsibility to interpret the data shown on the chart (i.e., the units, the measuring process, etc.). For example, in the SF Bay Area, depths are measured at MLLW and shown in feet.
Displaying Tide and Current Stations
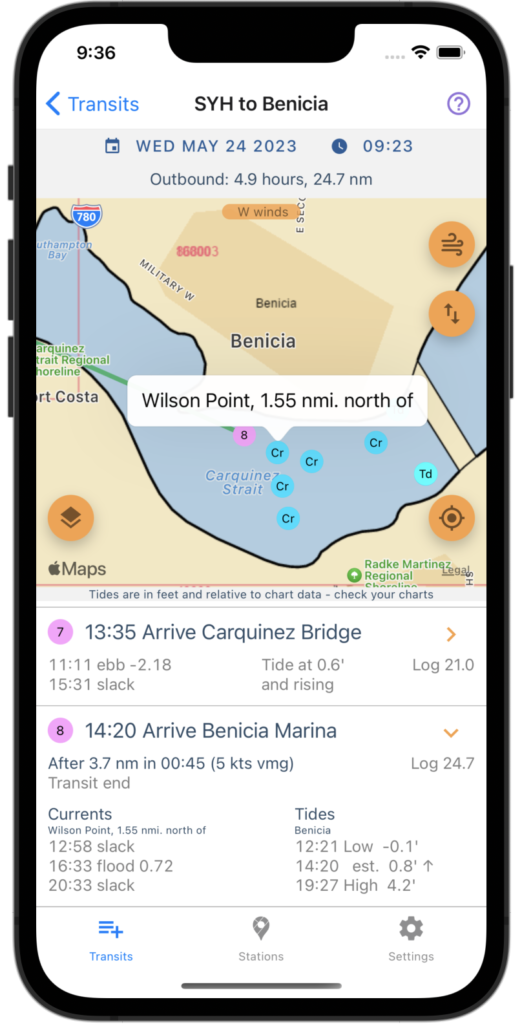
You can also display Tide and Current stations as an overlay.
Plan Your Sail will choose the closest Tide and Current station to each Waypoint for determining conditions at the Waypoint.
In the example shown here, data for currents is taken from the station “Wilson Point, 1.55 nmi. north of”, and you can see that station name shown in the details for the Waypoint.
Customizing
Boat Settings
Plan Your Sail uses a simple model for estimating boat speed and calculating how long each leg will take. The model relies on three settings:
- VMG – your boat’s average speed in knots
- Minimum Angle to Wind – how high your boat can point in degrees
- A factor used to derate speed when tacking back and forth going upwind
VMG
Velocity Made Good (VMG) is the boat speed you expect to average on your trip, in knots.
Minimum Angle to Wind
Minimum Angle to Wind indicates how high your boat can point before hitting the no-go zone.
Upwind Factor
When sailing a leg that points upwind, your boat will need to tack back and forth around the rhumb line. This, of course, means that VMG is slower than the boat’s speed. Plan Your Sail simply derates your VMG by the given upwind factor when calculating speed for leg requiring tacking back and forth.
For example, if your boat can average 6.0 knots on a trip, and you set your upwind factor to 0.7, then Plan Your Sail will use 4.2 knots (6.0 * 0.7) as VMG when traversing an upwind leg.
Options
Expand Leg Details
The display of conditions for each leg can be expanded automatically when a Transit is opened. This is useful when running Plan Your Sail on a larger display, like and iPad.